
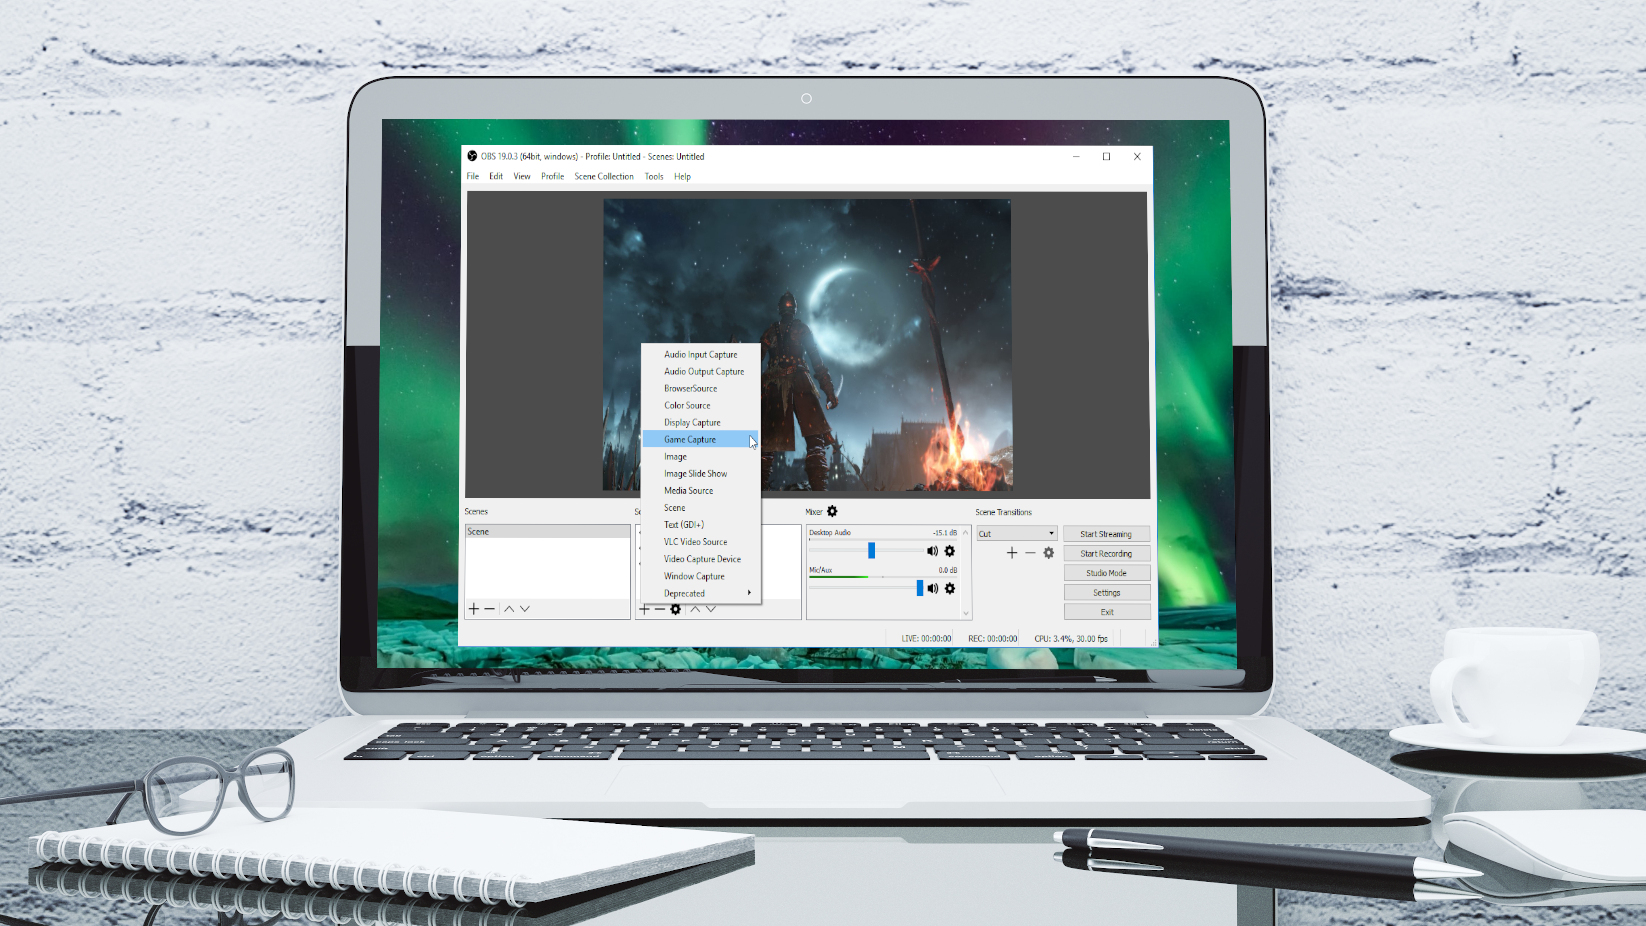
In my case, I wanted something for the long term, then I started to think about investing for a server or PC build. If it’s for a temporary purpose you could use some bare-metal service provider cloud and install gns3 service in it. To install gns3 in a remote server or a bare-metal host there are few things to keep in mind.įirst you need to decide how long should you be using the lab. Another machine to install the GNS3 client.You need to have Machine with a good configuration to install the GNS3 server.This is the second and best method as it provide good performance while working on the lab. I have been using gns3 with Vmware for long time, and I still do use it at times, but the best performance that I got when I installed the Gns3 service on a remote server kinda like gns3 bare-metal installation. Gns3 on a remote server or bare metal server Next let’s take a look at the next step 2. Now you have successfully configured GNS3 on your machine with VMware workstation pro. Since the GNS3vm is based out of Ubuntu it uses netplan to configure the IP address. Note: You can configure any IP address you want from the range as long as it is from the range 192.168.137.0/24. Hit enter to click on OK.Ĭome to the network field and hit enter to configure the IP address as below. 
Open VMware workstation again and power on the gns3vm, by default you may have a DHCP IP address. Though VMnet 2 would provide the IP address automatically via DHCP to the gns3, I prefer to use static configuration. Select the hypervisor as VMware workstation/Player In the gns3 client preferences window click on GNS3VM and check the option enable the GNS3 VM. In the Network, adapter choose Custom and VMnet2 as the virtual adapter. You can see two adapters in the gns3, you really don’t need to use two all the time, so let’s remove the second one. Open the VMWare workstation and right-click on the GNS3 VM that you imported and click on settings. Connect the GNS3VM to the VMnet2 interface. 
In the GNS3 preferences click on the server and on the Main server tab click on Host binding address, and change it from 127.0.0.1 to 192.168.137.1Ĭlick on Apply and close it. In the same location that you have downloaded the gns3 from, you will have to also download the gns3 vm as well.Īs you can see the IP address of Vmnet2 is 192.168.137.1 Download and import the GNS3VM to the the workstation. You can download the VMware workstation pro here. I know there are multiple hyper-visors are supported but I have been using Vmware workstation pro and it works great. You would have to also install VMware workstation pro to emulate the gns3vm in your machine. The first step of the method is of course to install the gns3 software, you may download it from here and install the gns3 software on your windows machine. Configure the IP address for the GNS3VM.Connect the GNS3VM to the VMnet2 interface.Change the host binding to the VMnet2 IP address.Create an interface called vmnet2 from GNS3.Download and import the GNS3VM to the workstation.You need laptop with good configuration.Īfter you have the prerequisite ready, now you can go ahead and install the GNS3 services using VMware workstation.In this method both the GNS3 client and the VM runs on the same machine. And then you configure the GNS3VM in the VMware workstation. First you install and configure the GNS3 client on the machine. This is the very common method of installing the GNS3 software. Gns3 on a remote server or bare metal server. But if you would like to get a good performance then you should use the GNS3 on a remote server. 
The first common way is to use the GNS3 with VMware workstation. There are two ways I use GNS3 for my lab purpose. How To Connect GNS3 Devices To The Local Machine?Įasy way to connect GNS3 to the internet on Windows host. How To Install Checkpoint Firewall In Gns3? How to Integrate VMware, VirtualBox, Qemu Vm’s in GNS3 ? so if you are like me don’t want to mess around much of the gns3 configuration and focus on your lab then this guide is for you.Īlso let me know in the comments section below how it turned out for you. Trust me the method I am showing here works so great for me for a couple of years now. In this article, I am going to provide the best methods that I follow to get my gns3 up and running. Configure the GNS3 client to talk to the remote server. How to install gns3 on remote server step by step?.Change the host binding to the VMnet2 IP address. Create an interface called vmnet2 from GNS3.
0 Comments
Webcam recording: If you want the option to record your webcam (either by itself or at the same time as a screen capture) then this is a feature to look out for, as not all screen recorders offer this.Įffects: This might not be something you need, but if you’re creating professional videos, look out for web recorders that offer effects like chroma key (to add different virtual backgrounds) as well as other effects like blur or zoom.īy taking some time to think about the factors and features that matter the most to you, you’ll have a better chance of choosing the best online screen recorder to suit your needs. Some recorders only use system audio, but for the best audio quality – without background noise – look for one that allows you to use an external mic. 
Watermarks: You’ll find free recorders that watermark every video, and those that don’t – so if you don’t want branding on your captures, look for one where you can remove watermarks.Īudio quality: It’s not just the video quality that matters – the audio is also vital to ensure those watching your video can understand what you’re saying. Markup: If you’re creating tutorials or training videos, you might want a web recorder with markup options so you can annotate and draw on your screen captures. Also consider what output formats are supported, such as AVI, MP4, MOV, etc.Įditing tools: Some web recorders have no editing tools at all, others offer basic tools to trim and crop your videos, while some have a full editing suite available to help you create polished, professional videos. There are some recorders that don’t do either and simply allow you to share your creations online. Display keystrokes and mouse clicks so viewers don’t miss any details. Video output/download: Look for a screen recorder online that allows you to download your videos to your device – or to the Cloud if you don’t want to store files on your hard drive. Draw on videos to highlight key elements in your footage. If professional, crisp videos are a must, you’ll want to opt for those providing HD output. With Vmaker, you can record your favourite YouTube videos with audio and save them to cloud or to your personal computer. Screen recorder tools can help streamline the video content creation process because they allow creators and professionals to produce high-quality recordings. Video quality: Some recorders capture your screen in SD quality, while others offer HD 1080p resolution. Export for the web, social media, or further editing in another video editor. Whether you’re using a Mac, Linux, or Windows system or looking for a recorder with an iOS or Android app, you need to ensure the recorder you choose is compatible with your OS. OS compatibility: This is one of the most important things to consider. With so many free web recorders around, how do you choose the best online screen recorder for you? There are a number of different factors you’ll want to consider: 
(Free online-only suite Google Docs, Sheets, and Slides also has frequent updates but with less radical changes than Microsoft’s.)įor this reason, corporate IT managers and anyone who dislikes software-by-subscription will prefer the non-subscription “perpetual-license” version that Microsoft packages for Windows and the Mac as Office Home & Student 2021 ($149.99) or the high-powered Office Professional 2021 ($439.99) and Office Professional Plus 2021, available for corporate and educational use under volume-license plans. 
Microsoft 365 is a fast-evolving suite, with updates every two or three weeks, often with newly added features that change the interface in ways that may take some getting used to. From there, it goes up to Microsoft 365 Business Premium, which includes desktop software, at $22 per user per month. Business users can choose from various plans, starting with Microsoft 365 Business Basic for $6 per user per month, with web and mobile apps but no desktop software. The more economical Microsoft 365 Family costs $99.99 for up to six people, with up to 5 devices each signed in simultaneously. A one-person subscription, Microsoft 365 Personal, costs $69.99 per year for use in Windows, macOS, phones, and tablets, signed in to five devices at once. The full suite runs as a set of subscription-based desktop apps in Windows and macOS, with free mobile versions on iOS and Android and free web-based versions for any browser, making the suite available via the web for any platform, including Linux. Unlike rival suites, Microsoft 365 has native apps for every important platform except Linux. Microsoft 365 is already the best office suite overall and an Editors' Choice winner, and streamlining should only improve it. Outlook, for example, is in the process of being replaced by New Outlook, which is easier to use. To its credit, Microsoft is working on this. The main caveat is that so many complex features can sometimes be overwhelming. 
It's packed with features, available online and offline, gets regular updates, and does more to facilitate collaborative work than its competitors. Microsoft 365-formerly Microsoft Office and Office 365-is the behemoth of office suites. Best Hosted Endpoint Protection and Security SoftwareĬhances are that you already use Microsoft 365 and know how powerful it is. 
All of this is housed in a very compact aluminum alloy chassis that will easily fit on any pedalboard and be able to take road and gig punishment. The Donner Harmonic Square has 7-octave modes that you can switch by turning the main knob: ☒, ☓, ±4, ±5, ☗, 1 octave, and 2 octaves. Each of these delivers a different flavor of octave and lets you explore a myriad of sounds. By using its toggle you can choose between Sharp, Detune, and Flat. The Donner Harmonic Square Octave is an octave and pitch shifter pedal that will work great with any six-string guitar, 4-string bass guitars, baritone guitar, etc. It is one of the smallest guitar pedals in this list but offers flexibility and many features, making it an ideal candidate for those with tight pedalboards. The Donner Digital Octave guitar pedal is a solid and compact unit for those looking for a good budget option. Donner Harmonic Square Digital Octave (Best Value) Overall, a fantastic choice offering great tone, flexibility, options, and a great price. The MRX M288 Bass Octave Deluxe works with a 9 Volt battery or a Dunlop power adapter. 
The Dry Knob helps you achieve the precise blend of effects to signal ratio. Since these controls are independent of each other, it opens up a great array of tonal possibilities. The Growl knob is the mid-range, slightly edgy octave-below controls, while the Girth knob is for a smoother octave-below. The Growl and Girth controls are where most of the action is in this pedal. With a little adjustment, the M288 Octave Deluxe is capable of pricing sounds for the most discerning players. 
This pedal’s layout is simple enough to get a great tone right out of the box. To mix in your direct signal, you can use the Dry knob and if you wish, you can also add up to + 14 dB of internally adjustable mid frequencies (400 Hz or 850 Hz) by engaging the Mid+ switch.Īll of these options come in a very durable enclosure and a well-planned design. MRX’s 18-volt Constant Headroom Technology provides a good amount of headroom and great tracking. The MRX M288 Bass Octave Deluxe offers two independent analog sub-octave voices with a Dry control and a Mid boost switch to optimize the sound of our parallel clean signal. Growl controls midrange octave-below control.Girth controls low-frequency octave-below tone.It is very easy to operate ( with only three knobs) and allows you the flexibility needed for just doubling lines all the way to creating your very own experimental sounds. It is a dual-voice octave pedal that allows you wide options for tone shaping while offering analog sound and true bypass. The MRX M288 Bass Octave Deluxe pedal is our top pick for this list. TC Electronic Sub ‘N’ Up Octaver Dual Octaveġ. 
But maybe the backstory will help justify why it’s so valuable…Īlthough the artwork is the same as the Charizard you might know from Champion’s Path, this is a Japanese promo prize award, where only 600 copies were ever made. You might be thinking $9,300 for a modern Pokemon card is insane! I mean, you could buy a PSA 8 1st Edition Base Set Charizard for that. 2020 Pokemon Japanese SWSH Promo HR Winner Hyper Rare Charizard VMAX #104 PSA 10 Recently Sold for $9,300 In this article we’re going to look at the most expensive Rainbow Pokémon Cards of recent times, and how much these bad boys sold for! With most sets having a rainbow rare pull rate of 1 in over 60 packs, it’s easy to see why they’re so sought after.Ĭombine that with trying to pull the most valuable cards like a rainbow Charizard or Pikachu, it’s understandable why collectors pay hundreds, even thousands for highly graded cards. These beautifully designed, secret rare cards are the ultimate chase for modern collectors.īut they’re not easy to get your hands on! Rainbow Pokémon Cards were first introduced as part of the Sun & Moon era in 2017. The Top Most Expensive Rainbow Rare Pokémon Cards Ever Sold If you buy from a link, we may earn a small commission. This page may contain affiliate links to places like eBay and other online retailers. How to Grade Your Pokemon Cards With Beckett.Where to Grade Pokémon Cards in the UK?.How to Sell Your Pokemon Cards Profitably. 
Pokemon XY Evolutions Booster Box – Should You Buy One?.Best Pokemon Cards to Buy Raw and Grade.A Detailed Guide to Pokemon Card Values.Most Valuable Pokemon Cards from This Past Year.Most Expensive McDonald’s Pokémon Cards.Most Expensive 1st Edition Pokémon Cards. 

Sometimes some words don't even make any sense at all. Just like using different words can drastically change the meaning of a sentence, using different clips together can drastically change your output. If you do this, Resolume will automatically transpose the video to the length of the audio to make an audio-visual clip.Ĭheck out the Preparing Media page for tips on optimising your content for Resolume. You can drag an audio file and a video clip or image file onto the same slot to make a combined clip. 
Loading media into a clip is simply a case of dragging it over to a slot in the deck. Next to the heart is a toggle that enables you to show or hide thumbnail images for media files - really useful when you can't quite remember what you called that fantastic clip you made last night! Also, you can double-click a clip name to preview it in the preview window, to be really really sure that it is the fantastic clip you made last night. You can add or remove items from the favourites list via the big heart icon in the top right. Tip! If you need to search through a long list of files and you already know the name of the file or folder you're looking for, type the name into the search box to narrow down the list of possible suspects.Ĭlick the dropdown at the top to show a list of root drives on your system, as well as a list of favourites. 
The main part of the browser enables you to browse through folders by double clicking them. You will find the browser over to the right of the display, in the Files tab. You can do this by dragging and dropping files from your operating system file browser or you can do it using the built-in browser. Adding Contentīefore you can start having fun with your content, you need to get it into Arena or Avenue. Tip! If you're really adverse to clicking with the mouse, you can assign shortcuts to these two little fellas in the far right of the deck area and scroll through. When you select a deck, all of the clips in the deck are displayed in their layers. Keep them organised so you can always reach for the right selection.ĭecks are accessed through the set of buttons just below the clip layers. Also windows scaling sucks.Įdit to add: understanding is great but if you can tell the results from one is better than the other why even bother chasing the bad one? Also this is a very obvious reason for why it’s happening.Each composition can contain a number of decks, which you can use to manage your videos, still images, audio files and sources.ĭecks are like the records in a DJs record bag. So to recap: content is being spread out over pixels No longer pixel perfect. Guaranteed if you were able to get that close and see that fine of detail on your laptop screen it would be the same crap results. So blurry not straight lines that won’t line up upon close inspection because you are putting images on a giant led wall that you can now examine and see up close. The resolution is the same but the content is now mushed over multiple pixels on the screens instead of being 1 to 1. No you do that stupid windows scaling and now each graphical pixel(content) is now spread over a region of how ever many pixels you scale it to. Ok sounds like this guy is asking for the specifics of why scaling in windows is crap.Įxample: you have a pixel perfect LED wall that every pixel in the content lines up with every pixel on the screen. R/talesfromproduction All your weird stories R/LocationSound Location sound AKA Production Sound R/audiopost For post-production sound geeks in Games, TV, Film, and Broadcast r/crestron All that is good (and bad) in the world of Crestron r/broadcastengineering Also includes radio! r/CommercialAV Commercial audio, video, and control technologies If you have any questions or suggestions please feel free to messsage the moderators! We would love to make this a great and successful subreddit for all of us video engineers! Remember that no question is stupid and we work together to create a friendly community. All things video are welcome!įeel free to post anything you like from questions to pictures. From a dad with a camcorder to a professional engineer at the superbowl, or a small meeting room operator to a widescreen specialist, projectionist, LED wall engineer or a electrical video engineer. This subreddit is open to anyone to discuss, share and show their work, as well as ask questions towards anything concerning video production. Welcome to r/videoengineering! Inspired by our brother subreddit: audioengineering 
With the real-life dangers of frostbite and hypothermia it becomes very important to crack the code of wind chill and produce calculations that people can rely on. And the lower the wind chill is the higher the risk of health consequences as more heat is drawn from the body, which lowers the skin temperature and, ultimately, the internal body temperature. It seems obvious that the faster the winder and the colder the temperature, the lower wind chill. The reason a windy day feels colder is because more heat actually is taken away from the body. It seems strange that a subjective experience, such as how cold a day feels, can be measured quantitatively. For your own purposes, you can check the speed of the wind and the air temperature in your local weather forecast. 
This accuracy of this measurement is, of course, critical in getting a meaningful result from the wind chill calculator. Although it looks like a weather vane, it uses four bowl-shaped appendages, tilted to one side, giving it the ability to accurately measure the speed of the wind. Wind speed is measured by using a tool known as an anemometer. T_a is the air temperature in degrees Fahreheit,Įven if these equations seem complicated - don't worry! With our calculator you can estimate wind chill easily, both, in Fahrenheits and miles per hour, or in Celsius and kilometers per hour.T_wc is the wind chill in Fahreheit temperature scale,.Or, if you use Fahrenheit and miles per hour: v is the wind speed in kilometers per hour.T_a is the air temperature in degrees Celsius,.T_wc is the wind chill in Celsius temperature scale,.The current formula for the wind chill calculator in Celsius and kilometers per hour is as follows: The wind chill calculator puts it into a concrete figure, which is extremely useful for practical purposes. This is the mechanism of the cooling effects of the wind. This causes the skin to radiate more heat into the surrounding air, causing your body to cool down quicker, decreasing your body temperature. When the wind blows, it increases convection and removes this boundary of warmer air, replacing it with fresh, colder air. 
the air is still, this boundary of warmer air stays with you for longer, trapped (for a time) by the hairs on your skin. Your body naturally emits heat all the time, warming up the air around your skin.

For example, suppose the common ratio is 9. 
Then each term is nine times the previous term. Each term is the product of the common ratio and the previous term. A recursive formula allows us to find any term of a geometric sequence by using the previous term. Each term is the product of the common ratio and the previous term. Using Recursive Formulas for Geometric Sequences. Geometric sequences follow a pattern of multiplying a fixed amount (not zero) from one term to the next.The number being multiplied each time is constant (always the same). 
And if you would like to see more MathSux content, please help support us by following ad subscribing to one of our platforms. Explicit Formulas for Geometric Sequences Using Recursive Formulas for Geometric Sequences. Still, got questions? No problem! Don’t hesitate to comment below or reach out via email. Using Recursive Formulas for Geometric Sequences. Personally, I recommend looking at the arithmetic sequence or geometric sequence posts next! Looking to learn more about sequences? You’ve come to the right place! Check out these sequence resources and posts below. Think you are ready to solve a recursive equation on your own?! Try finding the specific term in each given recursive function below: Practice Questions: Solutions: Related Posts: Shiva Prime is known to have special defenses made for it, from Ivans confrontation with Commander Gauge over Altair II. Ivan then teleports onto Shiva Prime and successfully defeats Commander Gauge on its surface. Shiva Prime is then first seen as Ivan enters the Quantum Gate to Seraphim VII and bears witness to Commander Gauge launch Shiva Prime into Seraphim VII's upper atmosphere. The Royal Guardians aid Gauge in his campaign to seize Shiva, by ripping data of Shiva Prime's launch sequence. 
Brackman, that Shiva Prime is an extremely effective terra-former, that has existed long before the Seraphim. At the start of the Cybran campaign, Ivan is told by Dr. Except Thalia is reminded by Gauge that she 'helped him acquire the last remaining piece of the Shiva Prime puzzle'. Dominic Maddox doesn't even get to know what Shiva Prime is until Ivan shows up at the Coalition Commander Center on Altair II, same with Thalia. Its origin, or even its description, is heavily clouded until the Cybran campaign. Shiva Prime is said to be the cause of the entire Supreme Commander campaign. Brackman, it is far more advanced than any terra-former the Coalition has produced, for it works a lot faster and works on all classes of planets, assuming it has a nearby sun. Shiva Prime is an ancient (to the Supreme Commander 2 standards) planetary ecosynthesizer, said to have existed before even the Seraphim by Dr. This can be fixed by having the kraken submerge and destroy another unit.Shiva Prime in the last mission, from above There's a glitch where if a kraken is attacking another unit and then submerges, the beam attack will still be going even ordered to move.The Kraken Experimental Submarine somewhat resemble the Alien Scout from Crysis.If it's struggling to destroy a ship, just let it come up and use the laser tentacle.The Kraken is better off being used as a base defense for incoming naval or air units that try to go around your base. The Kraken is somewhat useless in groups if attacking targets on land as usually only one will be able to attack and short range artillery or land units can easily deal with it. 
If an opponent is amassing a powerful air force to counter your navy, a modest force of ships can be used to lure in an attack in which you can position a number of Kraken submarines to surface and quickly destroy a large airforce.Although the Kraken costs an insane amount of resources, it is a formidable tool able to destroy land, air, or naval units.(If the Kraken is up against 10 to 12 Tigersharks it will lose very quickly and most likely won't even kill one of the submarines) Though armed with torpedos do not leave the Kraken unguarded because it is EASILY overwhelmed by a few submarines.The Kraken is one of the 3 units that can submerge in the game - the other two being the UEF Tigershark and Atlantis II.Conversely the only unit the Illuminate has to target submerged units is the Wilfindja, (and Yenzoo tank with DLC and research) if the Illuminate player possesses one, It is a waste of resources to construct a Kraken as the Wilfindja will be an even fight for it for approximately half the resources and less than half the build time. It is ineffective against the IIluminate when submerged due to torpedos having no effects on hovering tanks and units.In exchange, it cannot use its tentacle weaponry. You can submerge the Kraken, which makes it vulnerable only to torpedo weaponry.Do be careful about the frankly obscene amount of resources this will consume however. Use the fact that the ACU builds twice as fast to your advantage, allowing you to make these units in 1:35 rather than 3:10, quicker than any assisted gantry.Because it is submersible, it can easily escape from an unbalanced enemy force. It is also equipped with 3 torpedo tubes which it uses to engage other submerged units. It is equipped with 8 tentacles which fire laser beams that are effective at targeting naval, land, or air units. The Kraken Experimental Giant Submarine is a Cybran major experimental naval unit, having the appearance of a large squid.  
Direct Fire Experimental - Continuous Beam This Passport photo editor/creator app makes it easy to create passport photos for United Kingdom Driving Licence of 35x45 mm (1.37x1.77 Inch) dimension or 500+ other document types online. By using the AI automatic plan you can adhere to additional requirements such as background color, face biometrics, official photo guidelines, file size, etc. Our photo generator takes care of document specific size and biometric requirements when generating your free photo. The photo should be taken within the last 6 months to reflect your present appearance.Headphones, wireless hands-free devices or similar items should not be present in the photo.You should not wear any uniforms or hats in the photo except for religious cases.However, you can also upload your own templates or start from scratch with empty templates. People often use the generator to customize established memes, such as those found in Imgflips collection of Meme Templates. Both the eyes should be opened facing straight to the camera. Its a free online image maker that lets you add custom resizable text, images, and much more to templates.The expression for the photo should be neutral.The photo should expose all the vital parts of your face from the top of the head to the chin.(Printing is not required for online applications) The photos taken should be coloured and printed on a good quality photo paper.Check the base of any new text you enter to ensure that it lines up with the other characters on the ID.Try to modify as few of the text fields as possible since the clone tools in editing programs will only work on a smaller scale with the complicated backgrounds of most IDs. If you plan on changing entire lines of text, the end result is going to look really bad.Similarly, you can turn a 6 into an 8 by cloning the bottom right of the lower loop and pasting it into the opening. For example, you can turn an 8 into a 6 by clone stamping the upper section of an 8 on the right. You can zoom in and modify the text that already exists instead of replacing it.Ditch the boring, outdated black and white identity cards as its time to give these. Place a text box over any letters or numbers that you need to replace before typing in new values. ID Maker: Create custom ID cards in the snappiest way Branding logo maker. fake driver license id,Visit Site:fake provisional license online,fake driving licence maker online,fake full driving licence. Move the copied piece of background over the letter and number and place it to make it seem like it was never there in the first place. Zoom in on the ID and copy the blank piece of background right next to the letter or number you’re changing. Use the clone tool or “clone stamp” to cover any letters or numbers that you want to change. Try to duplicate the background on the original ID by hanging a drape or bedsheet of the same color behind you.Ĭover type by copying and pasting the background over old text. If you need to take a new photo specifically for your new ID, use a camera and a tripod to take it.Select “bring it to the front” or “front” to make it lay on top of the ID. If your new photo won’t go in front of the ID, right click it and find the layers tab. 
Hold the shift key down in Microsoft programs while dragging the corner of a photo to keep the ratio between the sides of the image identical to the original photo.Alternatively, you can put the new photo over the location where the photo belongs on the ID and the cut the sides of the image off with the crop tool in whatever program you’re using. Car fake risk history online description report with warning vehicle access on computer laptop or internet. 
Drag it on top of the original photo until you’re happy with the location. Explore a wide range of options to make your fake ID look realistic and. Export the new photo to a separate file and then open it in the same project as the scanned ID. Design and print your own fake driver license using customizable templates. Trim the photo so that it is a similar size to the original ID’s photo. Open the photo that you’re going to use to replace the current photo. Paste a new photo over the current ID’s image if you scanned someone else’s ID. |
AuthorWrite something about yourself. No need to be fancy, just an overview. ArchivesCategories |

 RSS Feed
